 Nik Collection are a package of seven powerful editing plug-ins photography tools, now completely free. Previously, Google sold the plugins for a steep $149. These plug-ins includes filter application that improve color correction, to retouching, image sharpening, noise reduction as well ability to make adjustments to tonality of images.
Google acquired Nik Collection with 2012 purchase of Nik Software, the German company that is better known for the Snapseed apps for Android and iOS. While Snapseed is a simple yet powerful for mobile users, Nik Collection is geared towards professionals and enthusiasts. The suite sold for $500 before Google acquired it, and it later went down to $150. Now Google has decided to offer the package free for everyone. Well, it could also mean that there would be no more new releases of this great collection, moreover there had been no updates in the last 3 years.
Note that, these are plugins, not standalone tools, so you will need the programs listed below. If you bought Nik Collection since January 1, 2016, you will automatically receive a refund over the following days.All said, these collections are one of my best plug-ins. (more…)
Photography as a hobby is fun, exciting, sporting and adventurous, however it can get pretty expensive and difficult to sustain with your dream for expensive and best glasses. It’s this one factor which most newcomers without analyzing their primary needs and not knowing what to buy, die out on their passion rather too quick. Before you browse further and jump to conclusions, please remember lenses or for that matter additional camera gears are important and awesome update to your photography journey, but it’s a still a small part of the equation in taking good picture – ultimately its you as a photographer’s skill which adds to the most important factor. Don’t let the lust for expensive gears (the list are exhaustive both from native and third party manufacturers) get the best of you, unless you are ready to sell your organ or blow your fortune.
Try to become one of the best photographer and work in one of those company who would pay you huge salary as well as lent out those expensive gears on field.
Below are the Top 10 World’s most expensive lenses –
1. Leica 1600mm f/5.6 Telephoto Lens
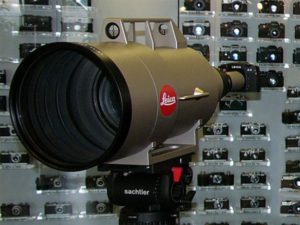
It doesn’t come as much of a surprise that the world’s priciest lens is a Leica with their impressive red dot logo on it. Leica made this APO-Telyt-R 1600mm/f 5.6 custom lens for Sheikh Saud Bin Mohammed Al-Thani of Qatar at a price just topping US $2 million. This lens has never been sent out for review, nor has any picture published taken this lens. With a weight of 60 kg (132 pounds), it’s no wonder the owner also bought a custom Mercedes for lugging it around. (more…)
In principle Dynamic Range describes the brightness range of the scene we are photographing. It also means Dynamic Range is the amount of visible detail that can be seen or recovered between the lightest part of a photograph and the darkest. A scene with high dynamic range will have large difference in brightness between the darkest zones and the brightest. Photographer’s mentions dynamic range related to scene’s contrast or tonal range, which means the same.

Camera manufactures also talk about Dynamic Range with regards to the camera sensor. In this case, it’s the ability of the sensor to record these very high brightness ranges. This means that cameras with a larger dynamic range are able to capture both highlight and shadow detail simultaneously. DSLR’s have a larger dynamic range than point and shoot cameras because their sensors have larger pixels. Also generally, a full frame sensor can provide a broader dynamic range and better low light/high ISO performance yielding a higher quality image than a crop sensor.
Dynamic range is measured as EV values or stops. The dynamic range of the scene and the dynamic range of your camera are two different things.
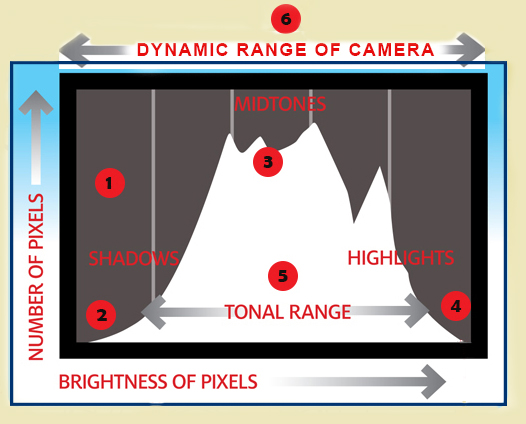
Let’s look at the illustration (above) and understand how to read the histogram in relation to dynamic range:
1. The histogram is a graphical representation of the tones in your picture, showing the number of pixels at different brightness level from pure black on the left to pure white on the right.
2. The ‘Shadows‘ in your picture are roughly the left quarter of the overall brightness range.
3. The histogram peaks in the Midtones with an average amount of shadow and highlights. The histogram shapes will vary depending on exposure.
4. The ‘Highlights’ are in the right quarter of the brightness range.
5. The dynamic range of the scene you are photographing is shown by the width of the histogram known as contrast range or the tonal range
6. The dynamic range of your camera can record, is shown but the width of the histogram scale. If the histogram won’t fit, it’s a warning sign.
Professionals always advice to shoot in RAW format, for a very simple reason a raw digital image shall have a wider dynamic range or color gamut than the eventual final image format, and it preserves most of the information of the captured image.
While we understand the importance and advantage of Dynamic range, we also need to understand few issues when using dynamic range and the likely solution to the same.
Issue 01 – Landscape
In landscape, the sky is often much brighter than the landscape itself and no single exposure can capture both.
Solution: Landscape photographers use graduated filters to block some light and bring the bright sky back into camera’s dynamic range.
Issue 02 – Sun & Shade High Contrast
Bright sun under clear sky can produce a difference between light and shade that’s just too large for the camera to cope with.
Solution: Shoot RAW, RAW files contains extra highlight and shadow detail that you can recover later in post processing
Issue 03 – Portraits faces in shadow
Backlighting will either leave your subject’s face in shadow or if you increase the exposure will make the background blown out.
Solution: Fill-flash to lighten your subject’s face and bring the scene back into camera’s dynamic range.
Issue 04 – Dawn and Dusk and in Extreme Contrast
At sunset and twilight the sky is often so much brighter than the rest of the scene that you can’t capture the full brightness range even with camera. Also in extreme contrast situation where you have a wide extraordinary range of contrast in a scene, a range far greater than any camera’s sensor can capture. A type of situation where you have enough shadow and highlight, the camera is going to have trouble capturing the ends of that drastic range. If you choose to meter for the highlights (the bright areas), you’ll lose pretty much all the detail in the shadow areas of the scene. Try it the other way—meter for the shadows—and it’s likely you’ll end up with what are commonly called “blown out” highlights.
Solution: Use HDR, shoot the scene in a series of different exposure commonly called Bracket to capture both shadows and highlight details and then use HDR software to merge them into one image
 ShutterXpose organised Star Trail Photography and Steel Wool painting (one of the spectacular form of light painting) workshop for it’s members. The weather was perfect and we planned for a long stay at the desert followed by finger licking BBQ dinner arranged by our members. The whole experience was quite successful and lived upto its expectation.
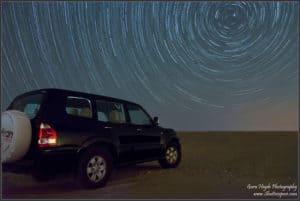
In this post, I would discuss on Star Trail Photography. I plan to post on Steel Wool photography soon.
Photographing a Star Trail is highly rewarding as well a challenge, but with bit of patience the whole experience would be fascinating. The challenge here is you don’t know exactly what the photograph will look especially if you are an amateur and have no previous experience shooting in the dark. The streaks of light which you see in the image here is the light left behind on the sensor from the stars as it travels across the sky with a camera on long exposure. The images which you capture are stationary stars and the rotation of the earth that makes them spin.
If you are planning for star trail photography, you need to find a place typically at the outskirts of the city, so as to be away from the city lights and smoke pollution. Check the calendar to find a day with a moonless night, you can use several smartphone apps like Moon Free or Moon Calendar to help you around.
There are two different approaches to do Star Trail Photography.
One method is to have a single shot, where you mount the camera on a Tripod, compose the shot, dial the shutter to the Bulb mode and keep the shutter open for almost an hour so that the stars create a trail as the earth rotates on its own axis. However the biggest concern is the digital noise due to high ISO and certain cases sensor heat-up in lower end camera models.
The second method is to take multiple frames and “Stack” them later using computer application, which is my preferred method.
Mount the camera on a sturdy tripod, compose the shot, dial the shutter to 20-30 second duration and capture as many as 100 or 150 or even more frames by using a Remote Shutter Release cable so as to avoid any shake, if you have a Mirror-up option in the camera you may use this option so as to capture almost sharp images. Shooting short exposures means less noise, you can shoot with a wide aperture and a faster ISO so that you will be able to capture more stars than the previous method. It is advisable to know the limitation of your camera to handle noise.
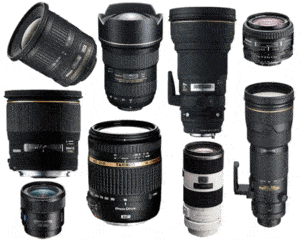 Every Camera lens manufacturers use general acronyms, abbreviations and terminology to best identify lens characteristics and its overall performance. At times they are confusing and as an amateur photographer you would have a daunting task to choose from.
I’ve listed below few lens brands with their native abbreviations and a short description. Hope this helps.
[table id=6 /]
 I had earlier posted of the biggest and most expensive firework event taking place this weekend.
Shooting Fireworks is always magical with the beautiful colors and the illumination produced. Generally people tend to think to shoot firework they may have to invest on powerful camera gears or telephoto lens. You can capture beautiful stunning images using a standard kit lens available depending on the camera make unless you need to fill your frame with fireworks then generally a telephoto lens (70-300 mm) will serve the purpose, else you may need to crop the picture.
Few quick tips to get those beautiful streaks of lights in your image
1. Check your location: It’s important to reach early, so as to get an unobstructed view. Check your horizon and the background, reflection of lights on the water or having a nice backdrop will add more dynamic change to your picture.
2. Use a Tripod: Since we would be using long exposure, there is every chance for camera shake. If you don’t have a tripod, then make sure to brace your camera against wall, railing or even a car to keep it steady. If you have no options then you may need to increase the ISO, this will give you shorter exposure without blurs but will also introduce noise in your image. You will need image noise removal application to reduce the noise during the post processing stage.
3. Remote Release: A wired cable release or a remote release will help you to eliminate the minimum camera shake. If you don’t have a remote release, the best would be to use the self-timer of the camera after setting the desired time. You may loose on the initial few shots of firework as you tend to calculate the time the shell reaches the sky and burst out.
4. Focus Setting: On a DSLR camera choose the M (Manual) mode and manually focus your lens to infinity (∞). You have to readjust the focus . On a Point & Shoot camera, you can use the Firework mode, landscape mode or the least night portrait mode depending on the availability on your camera.
5. Flash off: Camera flash or flash-guns are not powerful enough to reach fireworks.
6. ISO, Aperture & Shutter speed: The higher your ISO, the more sensitive your camera is to light. When shooting longer exposures (long shutter speeds) high ISO can introduce a lot of digital noise to your photograph. An ISO setting of 100 is a good bet. Check the following setting and experiment accordingly. (ISO 50 – Aperture range: f/5.6 – 11; ISO 100 – Aperture range: f/8 to 16; ISO 200 – Aperture range: f/11 to 22). Long Shutter speed will help to capture a perfect shot, you may need to experiment by using 2 sec to 10 sec or more depending on the duration of firework to see what works best. If you have a B (Bulb) mode setting you can use it to control exactly how long your shutter is open. The trick is to open the shutter right at the beginning of the burst and close it when it reaches its peak. Allow the smoke to disappear before you take the next shoot.
7. Take plenty of pictures: Carry more than 1 card, shooting firework is quite addictive. Try different setting, preview your first few shots to know you are satisfied with the settings.
Finally enjoy the show and be safe.
ShutterXpose team is quite pleased to be associated with couple of Professional photographers during their recent concluded photography contest. The team decided to have the contest evaluated by these professionals and then consider the aggregate points of each image based on technical evaluation to have the final 3 winners, so as to have an unbiased result. I along with the team felt quite honoured when these professionals agreed to form a 3 panel jury and conclude the evaluation result. The following were the judges for the contest.
 Digital photography contest are organized online by most Photography Associations, Clubs, Websites, Blog and Facebook Groups (Facebook has certain policies and conditions, please read before hosting)
Joining a photography competition is always exciting as it not only encourages you to do something different from the rest of the participants but also helps you to learn from other participants entries. The prize and the recognition further helps to motivate as a photographer. Most photography competitions are open to all level of photographers and most likely associated under a specific theme (both photography related and generic).
Many people assume that to join photography contests, one need to have the image taken by the best of camera (preferably a DSLR). This assumption itself is quite debatable, since a good camera is just a medium or a tool, it’s always the person behind the camera who captures the image with the best composition, the feel, the experience and technical knowledge. You would be surprised some of the latest mobile held gadgets help to get best shots. Also many people think that to win a photography contests you need to be at the right place and right time. The key to photography is to take picture very often and to keep learning using different composition, different lens and various lighting conditions.
 Panning is a technique of moving the camera parallel in synchronize with the subject as it is moving. Panning is a good old technique of capturing speed whilst the subject is in motion, popularly among Sports, Wildlife and Bird Photography. Proper panning gives the viewer, a feel of motion and speed keeping the subject sharp and the background blur.
 Nikon Manual Viewer is a viewer app for iPhones and iPads that allows user to download several of Nikon products manuals for DSLR, Nikon 1 and Speedlights within the app. This definitely is a welcome move to most users like me who tend to refer to their manual to find more technical information. Now that the complete manual is available at the tip of your hand, makes it more convenient. The best thing is it’s free and easy to use, you can download as much product manual you like. To download the manual you need Internet connection, once downloaded the manual are placed in the app bookshelf for future offline use, you can also sort the manual as per your choice. Tap a manual in the bookcase to launch the viewer. The viewer supports Table of contents, Index and Quick search, has the ability to add notes in pages and to bookmark them. The viewer is currently available in English and Japanese language.
Nikon Manual Viewer [link]
