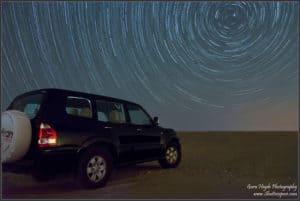
 ShutterXpose organised Star Trail Photography and Steel Wool painting (one of the spectacular form of light painting) workshop for it’s members. The weather was perfect and we planned for a long stay at the desert followed by finger licking BBQ dinner arranged by our members. The whole experience was quite successful and lived upto its expectation.
In this post, I would discuss on Star Trail Photography. I plan to post on Steel Wool photography soon.
Photographing a Star Trail is highly rewarding as well a challenge, but with bit of patience the whole experience would be fascinating. The challenge here is you don’t know exactly what the photograph will look especially if you are an amateur and have no previous experience shooting in the dark. The streaks of light which you see in the image here is the light left behind on the sensor from the stars as it travels across the sky with a camera on long exposure. The images which you capture are stationary stars and the rotation of the earth that makes them spin.
If you are planning for star trail photography, you need to find a place typically at the outskirts of the city, so as to be away from the city lights and smoke pollution. Check the calendar to find a day with a moonless night, you can use several smartphone apps like Moon Free or Moon Calendar to help you around.
There are two different approaches to do Star Trail Photography.
One method is to have a single shot, where you mount the camera on a Tripod, compose the shot, dial the shutter to the Bulb mode and keep the shutter open for almost an hour so that the stars create a trail as the earth rotates on its own axis. However the biggest concern is the digital noise due to high ISO and certain cases sensor heat-up in lower end camera models.
The second method is to take multiple frames and “Stack” them later using computer application, which is my preferred method.
Mount the camera on a sturdy tripod, compose the shot, dial the shutter to 20-30 second duration and capture as many as 100 or 150 or even more frames by using a Remote Shutter Release cable so as to avoid any shake, if you have a Mirror-up option in the camera you may use this option so as to capture almost sharp images. Shooting short exposures means less noise, you can shoot with a wide aperture and a faster ISO so that you will be able to capture more stars than the previous method. It is advisable to know the limitation of your camera to handle noise.
How to Capture Star Trail
Locate and identify the Pole Star. The Pole Star or the Polaris is situated exactly above the North Pole of the earth and stays there stationary. Since it is in line with the earth’s rotational axis, there is no relative movement of earth and the Pole Star. All other stars appear to move from east to west as the earth rotates around its axis but the Pole Star remains the same position. This is the principle behind those wonderful circular star trail images. If you are facing slightly away from the North Pole or towards east or west, you will get arcs in your final image.
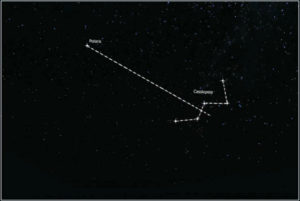
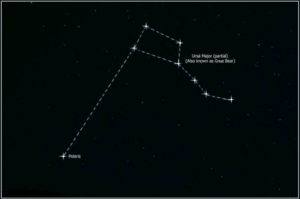
Identifying the Pole Star can be done based on two distinct constellations, one is the Great Bear which looks like a pan with a handle. This constellation is also known as the Big Dipper. The end two stars of the Great Bear are the pointers and when extended along a Virtual line should meet the Pole Star. The other constellations looks like a ‘W’ called Cassiopeia. The Pole Star is situation upwards from the top of the ‘W’. A perpendicular line drawing from the 4th arms of the ‘W’ meets exactly at the Pole Star.


If you want to locate the Pole Star smartly, then there are many smartphone apps like Sky Map available for both android and ios users. Just make sure you set the current location and have the cellular data connection available on the smartphone, with the app ON, point the phone towards the sky and slide through until you locate the Polaris. Simple isn’t it?
Let’s get things in action, ensure you have set the camera in Continuous shooting mode and the Long Exposure Noise Reduction is set to OFF, connect the Shutter Release Cable to the camera.
How to Focus and Compose in the Dark
It’s quite obvious, you won’t be able to Auto focus (AF) in the dark, to overcome this issue try the following.
If you are using a lens which has an Infinity (∞) marking, turn the focus ring to set to infinity.
It would be great to include a foreground subject and make sure they are in focus. If you are having issue still focusing then shine light on the foreground by using a Flash light.
Use the widest possible focal length of your wide-angle zoom lens, point to some bright star or an illuminated object far away. Try to take sample shots and check if the image is in focus.
Compose your shot not to include any direct light source.
Make sure you set the dial to Manual focus (MF). Take a few more trial shots and check to see if the exposure and composition are all good and you are satisfied. Ensure that you do not touch the set-up, click the remote and lock it, the shutter being in continuous shooting mode will remain open for 20 0r 30 seconds (depending on what you selected) and after every 20 or 30 seconds it will close and open for the next exposure, this will continue as long as the remote lock is on.
Once you are done capturing enough images, you can stack them all using computer applications, you can use Photoshop Stacking action which gets the job done but is slow or better use independent applications like Startrails (available only for Windows), StarStaX (available for Windows, Mac and Linux users) which gets the job quick and easy.
Thanks to all the members for participating and hope to catch up with a new exciting workshop soon…. till then Keep Clicking.
Posted are images taken by members during the workshop.
Location: Umm Al Aish (Drive on Road 80)
Coordinates: 29°40’58.90″N / 47°41’28.72″E
[slideshow gallery_id=”2″]


Thanks for the lovely post and thorough explanation. I'm from Dubai and an amateur in photography, I recently purchased my 1st camera a Nikon D5200 with 18-55 kit lens. I would be interested to know if I could capture a Star Trail with my current setup, also did you use any filter to bring the blue in the night sky. Thanks in advance.
Thanks for visiting the site & your kind words. It\’s more preferred to use a wide angle lens than a telephone to capture Star Trails, your lens would be good enough. Make sure you shoot at the widest aperture, you will need to bump the ISO to a higher number & follow the above guidelines. You shouldn\’t be using any filter as it will reduce the light entering the sensor, play with white balance to get a cool or warm looking image. Good luck.